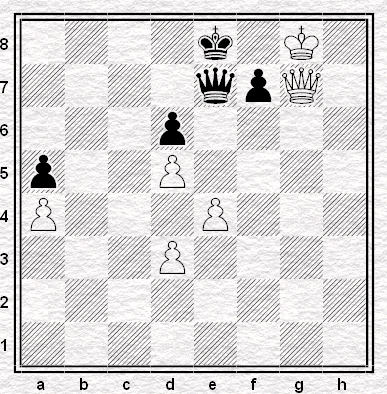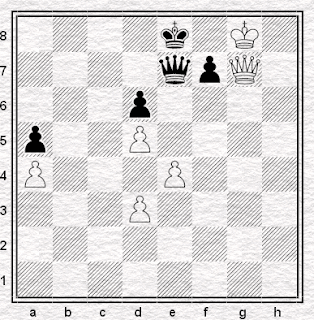
Until I'd taken the trouble to examine the other diagram correctly, I took this one as being straightforward enough. Black has everything covered: he has the f-pawn adequately protected and White's central pawns are in no position to advance. Black's pawns, however, are in no position to move: and it is this sad circumstance that is his downfall, as it means that one or other of his pieces must move away from the f-pawn, or from f8 allowing the queen to move to that square and subsequently take on f7 (or worse). It is zugzwang: Black loses because of his compulsion to move.
Or is it? Is it really? I don't know that it is. Because I can tell you for certain that this is a won position for White whoever has the move.
I started looking at the position and wondering, what if it was White to play and he did play 1.d4? Black must play 1...Qxe4 which abandons the f-pawn anyway. So, 2.Qxf7+ Kd8 3.Qe6 and what's happening here?

Obviously Black can take the d4 pawn, but only at the price of allowing the d6-pawn to be taken, with a check that enables White to play a further check putting his queen somewhere like c6 that defends the remaining pawns. Or Black can play his queen onto f4 (and subsequently g3 or h2) and hope to defend the d6-pawn.
But in fact, he can't, because beginning with the paradoxical 4.Kh7, White can gradually manoeuvre the king closer to the Black pawn and eventually take it. The variations are far too plentiful for me to show them, as one might imagine where queen endings are concerned, but I am quite sure that eventually, we will reach something like this with White to play:

Now is that ending won for White? I don't know for certain. I do not possess the knowledge or experience of queen endings (or the tablebases) which would tell me. However, I am pretty sure that it is, it's certainly a good practical winning try and I'm sure if I reached that position in a game I think I would expect to win. Moreover, it's some distance away from the impression I previously had - that White, in the original game, could make progress only because it was Black's turn to play.
But there's more. There is a better line, one I confess I did not find myself and probably never would have done. (You might, in fact, like to try looking for it yourself before finding the answer below. I imagine it would make a very good endgame exercise - but only, I think, for the advanced pupil.) From the diagram, White to play, what is the best move?

What did you find?
My computer found 1.Qh6!!

Now there are rather fewer lines than before and they are rather more definitive:
(a) 1...Kd8 2.Qf8 exchanges queens and wins ;
(b) 1...f5 2.Qg6+! followed by 3.exf5 promotes ;
(c) 1...f6 2.Qg6+ Kd8 3.Qg7 Qe5 4.Kf7 wins the f-pawn. Now Black can win the a-pawn but White will win the d-pawn in advantageous circumstances, e.g. 4...Qe8+ 5.Kxf5 Qe5+ 6.Kg6 Qe8+ 7.Kf5 Qxa4 8.Ke6 and wins, or 6...Qg3+ 7.Kf7 Qxd3 8.Qf6+ Kc7 9.Qe7+ Kc8 10.Qxd6 and wins ;
(d) 1...Kd7 2.Qf8! Qg5+ 3.Kxf7 and the point, very hard to see in the original position, is that when White's king is checked he can put it on the eighth rank and then interpose with his queen.
I would love to provide you with an online play-through to demonstrate these variations: as it is, you'll have to use a board! But I think they demonstrate that in the initial position, even if it is White's turn to move, he still wins.
So - is it the compulsion to move, in the position above, which is the cause of Black's defeat? I really don't know. It is true that, having to move, he is obliged to dismantle his own defences. As opposed to the other diagram, where he had no defence in place, he does have one here - but, having the move, he cannot maintain it.
Now on one view, and it's a view I probably agree with, that is zugzwang. Let us have a look at Bennett's definition again:
In chess it is used to decribe a position in which a player is reduced to a state of utter helplessness. He is obliged to move, but every move only makes his position worse.On this definition, zugzwang merely requires that a player's compulsion to move compels him to lose. It is his move, and he must hand over his position to his opponent when he does: that is enough. Nor, incidentally, does it say that he must lose as a result of his self-inflicted disadvantage: he must just "make his position worse".
But there is a view that implicit in the concept of zugzwang is something else - that were it not the player's turn to move, he would not be forced to lose. Such as is the case in this simple position, for instance:
 Black to play must move 1...Ke8 or 1...Kc8, both of which lead swiftly to defeat - whereas if it were White's turn he could make no progress, other than to inflict stalemate.
Clearly the first position is not of that type. Considered simply as a position, it makes no difference who is to move, White wins either way. But considered as a game position, the player to move must do himself harm.
To me, that's zugzwang: at the very least, it's an element of zugzwang, and I think it's more than that. But I can imagine a purist taking a different view.
Sometimes chess is all about facts. Checkmate is a fact, and a drastic one at that. But sometimes, in chess, it depends. Sometimes it depends what you mean. Is this zugzwang or is not? Does it depend what you mean by zugzwang - and if so, what do you mean by it? Is there any true zugzwang in Zugzwang?
19 comments:
I find myself in the rather unusual position to me at least of being a purist, then!
I agree that your third diagram must be won for white, but I'd like to be more convinced that we get there inevitably from diagram 2. Black does not help by checking right away. Say 3...Qf4 4 Kh7 Kc7 5 Kg6 (I presume is the plan you had in mind, to play Qf6 next) 5...Kb6, and what then? Eg 6 Qf6 Qe4+ 7 Kg7 (Qf5 Qe8+) Qg4+ etc. How does white make more progress?
6.Qe8 (I admit my computer saw this) and if 6...Qxd4 then 7.Qb8+! is stronger than 7.Qb5+.
Personally I'd say it was zugzwang if you would lose because you had to move, but perhaps not a pure zugzwang (which as you suggest would only exist if you would be OK if you didn't have to move)
Fence sitting? Me?
That's kind of what I think - except with the rider that you don't necessarily have to lose when you're in zugzwang, it just means something unpleasant happens as a result. But although obviously I've been aware of the term for more than thirty years, I don't know whether or not this sort of thing has been discussed, and by whom.
Aren't you confusing "zugzwang" with "mutual zugzwang"?
I don't believe it is a requirement for basic zugzwang for the player defending to be losing whether or not they have the move. Simply that they have no move that doesn't make their position worse.
Richard
On second thoughts "mutual zugzwang" would mean neither player has a move that doesn't make their position worse.
But i stand by the argument that "zugzwang" on its own has nothing to do with the difference between whether a player has, or does not have, the move.
The immortal zugzwang game is not invalidated from being zugzwang simply because Nimzovitch, had he had the move, could have played Kh7, say, in the final position.
Hmm. Debating with myself, it appears there is indeed some debate about whether the Nimzovitch game was in fact zugzwang (although the ability to shuffle the king seems to be a bit irrelevant). I think i'd better withdraw from this one...
And finally, apologies for clogging up the comments, which clearly wouldn't have been necessary if i'd bothered to read the whole of the original post!!!
Richard
In answer to one of Richard's many earlier posts... in the strict definition, zugzwang is always mutual zugzwang.
To be honest Richard the post is probably too long anyway (which is why there's a nice short one today). I probably ought to have split it into at least two parts and possibly three.
Ah, thanks, yes 6 Qe8 is strong there.
Interestingly, I plugged your diagram 2 into Crafty and after a while it abandoned Qf4 and suggested that black should simply go straight for ...Qxd4 Qxd6+ Ke8. This is now a much improved (for black) version of your diagram 3. If eg Qc6+, simply Ke7, and if Qc7+ Ke8, then Qxa5 or d6 allows perpetual with Qg4+. (Queen exchanges no longer favour white: the K&P ending is drawn.) White can't approach his king to help the pawn promote without just getting pushed back by checks. (He can nudge the black king to d8 and play Kf7, but then Qa7+ etc.) So it seems that black can hold after all. Crafty's eval creeps ever downwards in the += range.
Of course Qh6 instead of d4 in the first place is convincing. Perhaps an FM or better would see this quite naturally.
I think "pure" zugzwang is probably most often a feature of composed positions or simple thematic ending ideas like the one you gave; but there's no harm in using it as a slightly less accurate description of practical positions.
That looks possible to me. Of course it's necessary to see something very clever: that after 5.Qe6+ Kd8 6.Kf7 Qa7+. 7.Kf8 Qc5+ 8.d6 Qf5+! with va stalemate (there's also a stalemate sacrifice after 8...Qf2+).
I don't know that an FM would see 1.Qh6, actually: I think it's really hard to see. It'd be interesting to run it as an exercise, but even then of course you're telling people there's something there. Mind you, 1.d4 might be a useful decoy in that respect.
I might see an FM later today - perhaps I'll ask him...
About an hour after I'd originally posted, I realised that I could have posted the puzzle position as an exercise, and then done the whole post, incorporating the solution, the next week. Never mind eh.
The stalemate is beautiful - but not actually necessary, since you can also just play the perpetual after 8...Qf2+, with any queen interpositions leading to the drawn K&P ending as usual.
Conceptually maybe we could say that stalemate is the opposite of zugzwang - black is saved because it's his move, and he has no move; whereas white to move would win.
Look forward to the results of your experiment on the FM. ;)
I'm pretty sure I'd have found Qh6. It's pretty obvious when you consider the lack of alternatives, so a simple process of elimination method gets there.
Richard
1. Qg4 with the threat of Qc8+ looks pretty strong as well.
1... Qf8+ 2. Kh7 and Qg8 or Qc8
1... Kd8 2. Qf5
Richard
Aaargh. 2... Qe8+ and Qxa4. Never mind.
Unfortunately I wasn't able to speak to the FM as by the time I finished my game there were only a few minutes left in the Scotland-Italy match...
Post a Comment